Posts

The Final Product

Image
Website:  https://interlinkedmovie.wixsite.com/interlinked-movie postcard: https://www.canva.com/design/DAFezRfj-Xo/L00KSww2EosdiRXUIGiaYw/edit?utm_content=DAFezRfjXo&utm_campaign=designshare&utm_medium=link2&utm_source=sharebutton This is our short film Interlinked, We hope you enjoy the ride as much as we did! All our socials are linked in the description of the video.

The Final Touches

Image
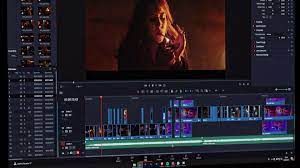
For us all, the editing process was a crucial part of creating our film. We spent many hours reviewing footage, piecing together the story, syncing audio and video, and color grading. It was a time-consuming process, but we knew it was necessary to create the final product we wanted. One of the challenges we faced was deciding which shots to use and in what order. We had to make sure that the story flowed well and that each shot added to the overall narrative. We also had to be mindful of pacing, tone, and mood. Another challenge was finding the right music for the film. We wanted to use music that fit the mood and tone of the scenes, but we also had to be mindful of copyright laws. We spent a lot of time searching for royalty-free music that fit our vision. Throughout the editing process, we had to stay in constant communication with each other. We had to make sure that everyone was on the same page and that we were all working towards the same goal. This meant being open to feedback

The Editing Stage

Image
  I know that learning to use Filmora X will require some effort and time. The last time I did a film project for school, I used a different software and version of Filmora. However, the basic principles of video editing still apply regardless of the software I use. I need to familiarize myself with the user interface of Filmora X. This includes learning how to import media files such as video footage and audio tracks. I need to learn how to use various tools such as the trimmer, splitter, and timeline. Understanding how to use effects and transitions can help enhance the visual appeal of my project. I also need to learn how to adjust audio levels and apply filters. Thankfully, Filmora X offers a wide range of features that can help me create a professional-looking project. I started with some basic tutorials online to get familiar with the software. Practicing with sample footage has helped me experiment with different features and effects. I've realized that paying attention to d

Our Music

Image
For our group project, we decided to use royalty-free music. Because our film is about a killer, there are not many regular songs that we could have used. Our group was considering regular music when the characters were sitting around but ultimately we decided not to. Contacting the artists and getting the rights to their music is difficult to do over social media, especially for those who have millions of followers. Many artists have their direct messages turned off so that they are not bothered by the constant conversations with fans. Even though our intentions were pure and we likely would have gotten their consent, we decided not to spend too much time trying to contact an artist. Instead, we opted to use royalty-free music. This allows us a wider variety of music while not constraining us to a specific song. The music lets us set a tone for the parts of the movie. When the characters are sitting around, we will have an upbeat song playing. When the person is killed, we will play e

Our Specific Camera Angles

Image
In the past two years of this class, we have talked about filming techniques. This is because there is a large emphasis being put on them. Because of the emphasis that I have been taught, I want to put a lot of thought into how I film this project. The first thing I need to do is make sure that I have the right camera angles. In the classroom, we watched many film examples. I have chosen a handful of filming techniques that I want to use based on these film extracts. They might not be put in the final film, but they are the ones that I felt might be beneficial to add. The first is the eye-level shot. There is nothing fancy about it, but it is very common in films and because of that, I want to add it to ours. It is almost exclusively a close-up or medium close-up shot, meaning that it is taken from a relatively close distance, and leaves most of the emphasis on the actor. Because it is a relatively close shot, I want to use it in our shot focusing on the victim. The next is an over-the

The Scenery

Image
The dark and eerie setting near Nick's house was the perfect location for our film project. As a student, I collaborated with my classmates Max and Jibril to create a short film for our school project. We were looking for a location that would match the ominous tone of our story, and the area near Nick's house fit the bill perfectly. The setting was surrounded by tall trees and bushes, which gave it a mysterious and foreboding feel. Nick's house itself was old and rundown, with boarded-up windows and peeling paint on the walls. We knew that we had to be careful while filming there, as it was private property and we did not want to disturb the neighbors. We arrived early in the morning to set up our equipment and plan out our shots. The natural lighting in the area was just right for capturing the dark and gloomy atmosphere we were going for. We also brought along some artificial lights and smoke machines to enhance the mood of the scene. Filming in the area near Nick's

Our Prop Setup

Image
As a student working on a film project with my classmates Max, Alec, and Denton we needed a prop murder weapon to use in one of our scenes.  We decided to use a knife as it was a common tool and easily available to us.  Using a knife as a prop for a murder scene was not an easy task as it posed a safety risk if not handled carefully.  Before we started filming, we made sure to practice using the knife safely.  We learned the proper techniques for holding and manipulating the knife, as well as how to keep it away from our bodies while using it.  We also ensured that the knife was blunt and had no sharp edges to prevent any accidents during filming.  Once we felt confident in our abilities to handle the prop, we incorporated it into our scene.  As the actor holding the knife, I had to make sure that my grip was firm but not too tight, to prevent any slippage or accidents.  I also had to be mindful of the angle and position of the knife to ensure that it looked realistic on camera.  While